Friday, December 26, 2008

Christmas Cupcakes

DSC01356.JPG

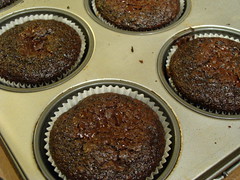
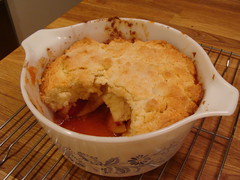
I love Christmas, because it is a really big excuse for me to bake. We do an open house every year so I can bake all the recipes that call my name during the month of December. Unfortunately, this December our party was the 23rd, and my last day off was the 8th. This really meant that I didn't have to do any of the cleaning, P did. It did mean I had to do all my baking after I got home at 6:30pm every night. I made these cupcakes entirely on the evening of the 22nd, and they were still perfect the next day, which is always a good trait for a recipe to have.

The cupcakes are the Chocolate Graham Cracker Cupcakes with Toasted Marshmallow, from Trophy Cupcakes (via Martha Stewart). I got my inspiration though, from Room for Dessert's version.

DSC01349.JPG

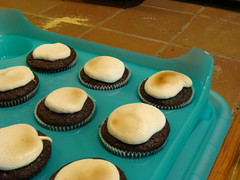
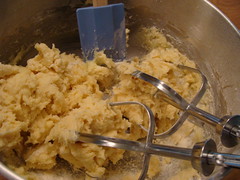
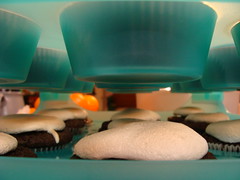
What really got me was when I took some in to work on the 23rd, everyone kept saying 'You made cupcakes from SCRATCH?!'. For me, the scary part was the meringue icing. I had never made a meringue that worked, until that night. As you can see, I never did get stiff, glossy peaks with my mixture, but my mixer was starting to smell like burning so I decided to cut my losses and just go with soft peak-ish.

DSC01357.JPG

The Cupcake Courier came in hand for storing and serving them. I only brought 9 in to work, so those went in a cookie tin. Work got 9 because the batter (which was very liquid, is that normal for cupcakes?) made 9 more than called for. Of course, I hadn't planned that, so those 9 didn't have the graham cracker bottoms, but they were still tasty, and still got marshmallow meringue goodness on top.

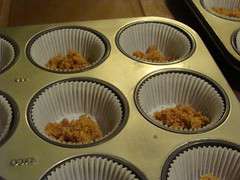
Speaking of amounts of stuff: I only made half the icing recipe, and managed to ice 33 cupcakes just fine. Luckily, I had 4 egg whites hanging around, as I'd made a 4-yolk shortbread earlier. I also did not sprinkle graham cracker crumbs on the cupcakes, because all that mixture went into the crunchy bottoms. The chopped chocolate I used was a mixture of bittersweet and dark.

Makes 24 cupcakes

Ingredients:
For the cupcakes:
2 cups plus 2 tablespoons sugar
1 3/4 cups all-purpose flour
3/4 cup plus 1 tablespoon cocoa powder (not Dutch-processed)
1 1/2 teaspoons baking powder
1 1/2 teaspoons baking soda
1 flat teaspoon salt
2 large eggs
1 cup whole milk
1/2 cup vegetable oil
2 teaspoons pure vanilla extract
1 cup boiling water
1 1/2 cups graham cracker crumbs
80 gr unsalted butter, melted
2 Tablespoons orange juice
150 gr bittersweet chocolate, finely chopped

For the frosting (which can easily be halved from these amounts):
8 egg-whites
2 cups granulated sugar
2 teaspoons vanilla extract

Directions:
1. Preheat oven to 350F (180C) degrees. Line 2 standard muffin tins with cupcake liners; set aside.
2. Sift sugar, flour, cocoa powder, baking powder, baking soda, and salt together into the bowl of an electric mixer. Add in the eggs. Using the paddle attachment, mix ingredients together on low speed, until the batter is uniform.
3. In a large bowl, mix together milk, oil, vanilla and boiling water. Add to flour mixture and beat on medium speed for 30 seconds. Scrape down sides of bowl and continue mixing on medium speed until the batter is uniform.
4. Place graham cracker crumbs, melted butter and orange juice in a large bowl; stir until well combined. Check the mixture - if you can take some of it between your fingers and unify it into a shape that doesn’t fall apart and all crumbly - that’s what where looking for. If still too crumbly, add some more juice, spoon by spoon, until you get it right.
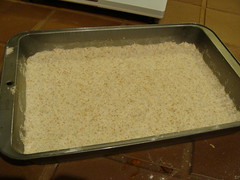
5. Place 1 tablespoon graham cracker mixture into the bottom of each prepared muffin cup. Use a tablespoon or the bottom of a small glass to pack crumbs into the bottom of each cupcake liner. Place a teaspoon of the chopped chocolate above it. Reserve remaining graham cracker mixture and chocolate for topping.
6. Transfer muffin tins to oven and bake until the edges of the graham cracker mixture is golden, about 5 minutes.
7. Remove from oven and fill each muffin cup three-quarters full with cake batter. Sprinkle each with remaining chocolate and graham cracker mixture.
8. Return to oven and bake, rotating pans halfway through baking, until tops are firm and a cake tester inserted in the center comes out clean, 18 to 20 minutes.
9. Transfer muffin tins to a wire rack and let cupcakes cool in pan for 10 minutes. Remove cupcakes from pan and let cool completely.

DSC01352.JPG

10. Prepare the frosting: Place egg whites, sugar, and cream of tartar in the heatproof bowl of an electric mixer. Set over a saucepan with simmering water. Whisk constantly until sugar is dissolved and whites are warm to the touch, 3 to 4 minutes.
11. Transfer bowl to electric mixer fitted with the whisk attachment, and beat, starting on low speed, gradually increasing to high, until stiff, glossy peaks form, 5 to 7 minutes. Add vanilla, and mix until combined.
12. Pipe the frosting on top of each muffin. If you don’t feel like piping, place spoonfuls of the frosting on top of each cupcake and arrange it nicely.
13. Slightly burn the frosting using a burner, or put it back inside the oven (see tips).

DSC01354.JPG

Monday, December 8, 2008

Sweet and Salty Cake

A few weeks ago, we had a potluck at work. There was a sign-up sheet with various spaces to put down your name, with only two dessert spots. I immediately claimed one by putting 'chocolate something' on the list. Someone had already taken the first dessert spot with 'carrot cake', so I thought there should be some contrast.

Sweet & Salty

As for what 'chocolate something' entailed, I wasn't certain until I remembered a cake I've seen making the rounds. Baked bakery's Sweet and Salty Chocolate Cake. The cookbook is on my Christmas list, but this recipe is on Martha Stewart's website.

I wanted a challenge, and boy was this a challenge! A fun one though. I'd been wanting to make a layer cake for a while. I want to be the cake-baker among my friends, the one people come to for a cake. I figured to become that person, I better start baking cakes. So I went out and bought some cake pans. I had one 8" pan, but this is a 3-layer cake after all!

DSC01277.JPG

I won't repeat the recipe here, but I will tell you what I found out.

That recipe makes a lot of icing. They said the caramel would do a couple cakes, and the ganache recipe would do one. This is NOT true. I actually made two of these cakes; one was a test that I took to our D&D night a couple days before the potluck. It was a completely different set of people, so no one got bored by cake. :) One recipe of ganache completely iced both cakes. Granted, I don't actually like icing on cakes, so I probably spread it thinner than the bakery does, but it would've been pretty overwhelming to have it all on one cake.

DSC01273.JPG

I needed two goes at the caramel, but that is more because my candy thermometer is a piece of junk. This I should know already, from my first adventure in cooking with Lester, on the fateful day we tried to make marshmallows. I have a feeling the caramel was supposed to be caramel-coloured rather than white, but I didn't want to risk burning it again.

I also ended up buying a Cupcake Courier (seen in the background of the top photo). If I do want to be cake lady, I need some snazzy transport. I'm also very excited by all the cupcake blogs out there, and want to try some of those for treats to bring in to work.

DSC01276.JPG

The cakes were well received at both events, and provided great snacks at work for the next few days. You only need tiny, sliver-like slices of this cake, even with my stingy icing job. The salted caramel is great, it cuts the sickly-sweetness of all the chocolate in the ganache (an entire POUND!). I used a hodge-podge of baking chocolate squares, which I think worked out to 6oz dark, 8oz unsweetened, and 2oz bittersweet.

Definitely put it in the fridge before transporting. The first cake needed to go in the car as soon as I finished icing, and I actually ended up using skewers to pin the layers together so it wouldn't slip apart. The second one had some time in the fridge (top photo) so it was good and sturdy. The Cupcake Courier worked well on my 15 minute walk to work. And I only got a few weird looks!

Tuesday, November 25, 2008

Mushroom Burgers: Rebuttal

I find it fascinating finding out what different foods mean to different people. Ask 10 people how they make grilled cheese sandwiches, and you'll get 10 different answers (I do mine under the broiler in the oven, and usually spread the bread with mustard first).
I actually made mushroom burgers recently (and by recently I mean before two weeks of double-duty followed immediately by tech week sidelined me), and they are totally different than the ones in the last post.

To me mushroom burger means that the mushroom takes the place of the burger. Roasted portobello caps do look a lot like conventional meat-y burgers to me.

DSC01205.JPG

Those are the mushrooms pre-roasting. There is an amazing recipe for roasted portobellos in one of my favourite cookbooks: Veganomicon: The Ultimate Vegan Cookbook

While I'm not a vegan (or even a vegetarian) there are so many recipes I want to make in this book. I won't repeat the recipe (copyright, you know) the mushrooms are roasted in balsamic vinegar, wine, some oil, and the little flecks in the picture are minced garlic.

They come out of the oven completely black, but so very very good. I've served them sliced up (when I couldn't find whole caps), chopped into a salad, and most recently: whole on a burger bun spread with mustard, baby spinach and caramelized onions.

DSC01207.JPG

They made a tasty, healthy lunch to bring to work on a whole-grain bun that didn't give me the sleepies by 3:30pm.

Which version is a 'real' mushroom burger? Both. Which is 'right'? Neither. Or both. Cooking and food are very personal things. And don't get me started on the vagueness of the language we have to describe it! I suppose my recipe is 'mushroom-that-is-a-burger' and Lester's is 'burger-with-mushrooms-in', but who would put either of those strings of words on a menu?

Tuesday, November 4, 2008

Mushroom Burgers: Impromptu

To the chagrin of my mother and sister, I rarely use a recipe. I'll read a recipe easily enough, see how it all sort of comes together and the base ingredients, but the simple fact is that I rarely follow it to the exact measurements. It's partially a product of 22 years ignoring walnuts or almonds, of ignoring sesame oil and saying olive oil or vegetable oil is 'good enough'.

But really? It's because I do what tastes best for the dish.

Really. Try it. All you do is continually taste and smell while you cook. You'll find you can refine your palate very quickly by being able to smell when something is getting too salty, too much meat or the touch of your food isn't the consistency you want.

So that said, this weekend I made Impromptu burgers.

What are impromptu burgers? I had ground chuck, portabello mushrooms, tzatziki, hamburger bun and fixins.

No pictures because I couldn't find my damn camera.

So no recipe, but here we go.

Start with the portabello. I had one and a half (don't ask why I have a half), clean them really well and dice them up. Do not, under any circumstances, ever, wash your mushrooms. Especially when they are one of the binding ingredients. The truth is that a mushroom is basically a sponge, wash it in water and it'll soak everything up...except what it's soaking up is water. Use a 2 dollar mushroom brush, keep em moist but not wet, and they will instead soak up the juices from the meat. That's a much better prospect.

So dice up your mushroom, I went for a particularly fine chop because my roommate hates mushroom, but I smuggled it in there all the same and was reasonably sure he didn't know the difference.

Add one finely chopped sprig of dill to the chuck, salt and pepper, and the chopped mushroom. Shape em into patties, I went with about 5 inches diameter (remember that ground meat shrinks like mad), and about half an inch width. All in all about a third to a half pound each. Lay em on some plastic wrap and toss them in the fridge to stiffen up a little. The constant problem with shaping with your hands is the heat from your hands melts the fat of the meat, makes it sticky and more likely to fall apart, so you need to firm em up.

It's alright, while those are in the fridge, grab an old yellow onion you forgot about at the bottom of a brown paper bag, slice into large rings. Prep a shallow pan with two tablespoons (Give or take, I never measure) olive oil and begin carmelizing.

Carmelized onion rings are godly. And should be added to more or less every burger in existence. If McDonalds ever comes out with a McCarmelized onion burger...well that'll simply be the end of the world.

That'll take about half an hour on medium heat, if they start crisping add a tablespoon of water to soften them up again, you want them to carmelize, crisp up. Toss on a bit of salt too for good measure.

At this point, your aforementioned roommate, who has no love for onions may complain. I sometimes turn on the fan to humor him. Sometimes.

After that half hour, push the onions to the side and grab the burgers, start frying them up in all that onion-juicy goodness. Don't overcrowd the pan and make sure the burgers don't touch each other. Next tip: DON'T TOUCH THEM.

Just leave em be. For my burgers, they took about 8 minutes per side, two flips, the last flip was just to brown evenly. You, and me, like everyone else gets anxious about things sticking to the pan. They won't, it's ground chuck, it has a fat content, the grease will pull them back up. No stress. The more you touch, the more likely they fall apart.

Toast your hamburger buns, if you're stupid like me you forgot to check your arugula and it's gone moldy, so these burgers are going without greens today. Spread one spoonful of tzatziki on the top, garnish with a spoonful of onion, add burger and voila.

I give you Mushroom Burger: Impromptu.

All in all, they took me not quite 60 minutes to make, half of which I spent idling in world of warcraft.

Go figure.

Tasty though.

Monday, October 27, 2008

How to Eat Well During Tech Week

I am just now commencing on every theatre person's favourite activity: Double-Duty.
I'm ASM on a show that runs until November 8th, and tomorrow (Oct 28) I start rehearsals for my next show. That's two whole weeks of double duty. Luckily, both my SMs are great, and we've worked out a schedule where no one gets shorted, and I even get half an hour for dinner! Even luckier, the theatres are across the street from each other.

Now, I know this isn't tech week, but it's as busy as (or busier!) than tech week, and I want to eat well. The secret, my friends is: PLANNING.

I started preparation for the next two weeks WEEKS ago. I don't want to be running to Starbucks or A&W for dinner every night, nor do I want to buy 14 Lean Cuisine meals and eat those for two weeks straight (well 3 weeks, because the day my show closes is the day the other one starts tech. I love my life), I want good, home-cooked food.

DSC01225.JPG

We made a big batch of chili, and froze most of it. Same goes for a stew we made in the slow cooker. Slow cookers are our friends in this business. It's great if you know you'll get home for dinner, just turn it on the morning and have tasty food at dinner. Or, take the extra 20 minutes when you get home at night to throw something together, turn it on, go to bed, and wake up to a week's worth of dinners all cooked.

Something else I enjoy is having the fridge full of good things for sandwiches. Last week, I carmelized a couple onions, marinated and cooked some portobello mushrooms, and made sure to have lots of salad greens in the fridge. Then I had all the ingredients for tasty, healthy sammiches right in my fridge. No more jam sammich just because I can't think of what else to put on the bread.

DSC01233.JPG

Speaking of bread, last week I also made bread, from my favourite bread book, The Tassajara Bread Book. It made 4 loaves, 3 of which went directly into the freezer. Keeping the loaves company are two batches of muffins, one sweet and one savory.

There's a company potluck on Sunday (and I still haven't shared the recipes from the last one! shame!) so I'm making my cookies today. They'll get their own post, because they are the best cookies in the world. I'm serious.


So, to summarize:

  1. Plan ahead.
  2. Make big batches of food when you've got the time.
  3. The freezer is your friend.
  4. So is your slow cooker.
  5. Stock the fridge with healthy stuff. If it is there, you'll eat it.
  6. Make your own sweets. We all need them (I could live on them!), but it's better when you control what goes in to them.
It bugs me so much when I see people stressing out during tech, and complaining about being sick and 'why am I sick now?!' when all I want to do is go up to them and say: 'maybe it's because you've been living on FRIES for a week?' Fruits and vegetables and balanced meals help you not get sick, and keep you more alert and on the ball. I'm a big believer in the fact that eating good homemade things keeps your body happy. Radical, I know.

Monday, October 20, 2008

Recipe: Pumpkin Cheesecakes

You American readers are lucky in that we Canadians have our Thanksgiving a month earlier, thus you get test-driven recipes just in time for you to plan your Thanksgiving spread.

This year, I got pumpkin cheesecake on the brain back in September. One member of the family being diabetic, and on a low-fat diet as well, gave me the perfect excuse to try Fat Free Vegan's Double-Layer Pumpkin Cheesecake recipe. While I am a meat-eater, I love vegan and vegetarian recipes. I really feel like I'm doing something good for my body when I eat them (especially as I seem to be developing some sort of dairy allergy/intolerance).
DSC01212.JPG
vegan to the left of me, dairy to the right, stuck in the middle with food

I'm not posting the actual recipes in this post, but you will get the results of the taste-test. After hearing me blather about the tofu-based cheesecake in the grocery store, the boyfriend did suggest I make two cheesecakes, and that one include actual cream cheese. The other recipe I used was from The Joy of Baking (minus the sour cream topping).

Now, our Thanksgiving dinner was on Sunday night. I worked right up until I hopped in the car to go to dinner, and my last day off was the Monday, so these cheesecakes were prepared in steps, in the dark, cold evenings after work. I made the crusts on Friday night, and baked the cakes on Saturday night, so they'd only sit in the fridge for a day.

Saturday night, after coming home from work and eating dinner, I got started. I decided to start with the dairy-containing one first. That all went very well. By the time it was in the oven, it was 9pm or so at night (I do most of my baking late at night). Then I lined everything up to start the vegan cheesecake. I was very excited to find out what Tofutti Better Than Cream Cheese tasted like, so I opened that first. What I found was green, and fuzzy.

DSC01210.JPG
the rum is called for in the recipe, and I didn't even drink any when I found the green fuzz

By 9pm, my local market was of course closed. I swore. I pulled out the Wii and played a round or two of Mario Kart. While driving recklessly off cliffs, I was doing theoretical math in my head.

"If I work at 11am tomorrow, and the store opens at 10am, but my boyfriend doesn't work until 12pm... is that enough time to buy stuff, make cheesecake and bake it? If so, will it have enough hours in the fridge before dinner..."

The answer to those questions was a resounding YES. Just. The boyfriend had to take it out of the oven and into the fridge so he wouldn't be late, but we did it.

And the results (when asked 'Which do you prefer?' poll of 8 guests):
Vegan Cheesecake: 8
Dairy Cheesecake: 1

DSC01218.JPG
the leftovers

Everyone agreed that the vegan was tastier! Even AFTER we told them it had tofu in it! I voted for each, because no pumpkin cheesecake can be bad in my mind. I do think the dairy version could've done with 10 more minutes in the oven, so that may have evened out the scores, as the main selling point for the vegan one was texture.

I've been eating both in the week since (I LOVE leftover desserts) and still like both. The tang the lemon juice gives to the vegan one gives a great refreshing kick.
DSC01219.JPG
double-layered vegan tastiness

Tuesday, October 14, 2008

Recipe: Jewish Apple Cake

DSC01202.JPG

In a strange confluence of events, I made Jewish Apple Cake (recipe from Smitten Kitchen) to bring to rehearsal (on German Unification Day, October 3) for a show about Nazis, concentration camps, and Jews.

It's a very powerful show, about the son of a war criminal who finds out what his father actually did during WW II when he was 17. He just thought they were living in Paraguay for fun and sun. It's a tough show to handle for 8 hours a day, so we do a lot of 5 hour days, and crack a lot of jokes. And eat a lot of cake. There's only 3 actors, but this cake was gone by the end of lunch. All in all about 6 people tucked into it in total, and all pronounced it GREAT.

DSC01198.JPG

It was super-moist, and sticky, and apple-y, and all in all a great treat for while you're sitting around doing table work.

DSC01196.JPG

I managed to use up yet more of those teeny apples. I cut up about 35 of them for this cake. I only really needed to quarter them to get bite-sized pieces.

DSC01195.JPG

When I had put the layers together, I was worried there wasn't enough batter, but it came through and rose to make one of my favourite cakes in a while.

Here's a sneak peak pic of how I cook:

DSC01192.JPG
Why bother printing when you have a laptop? I've even got a keyboard cover, so I can scroll with sticky fingers using the up and down arrows.

Sunday, September 28, 2008

Recipies: Double Crumble Rumble!

Today's post marks a Theatre Cooks first: the first 'original' recipe! By the end of this post, you will have the recipe for my mum's crumble topping. That is the taste of my childhood.
DSC01023.JPG

The event that lead up to the great Apple Glut of 2008 was our dear friend Lester coming over for some computer gaming with my boyfriend, and he brought with him about 5kg of teeny tiny green apples from his parents' apple trees. This being about a week before I was leaving for the land of more apples, I was pretty exited to get going on cooking these apples.

My first thought for apples isn't pie. It is crumble. My love of pastry is well-documented, but there is just something about crumble. Specifically the crunchy, sticky, fruity bits you get around the edges of the dish.
goodbits.jpg

I made a big, deep-dish crumble for us, and then made some apple crumble bars for easy eating at game night the next night. No pictures of the finished crumble bars, because that was at a friend's house.

The apples, as mentioned, were super tiny. We estimated that one regular apple would be about 6 of these baby apples. So when the recipe says '5 apples' imagine me cutting up 30 ikkle apples.
DSC01030.JPG

The crumble bars were very tasty. I made them for ease of eating, thinking I could just put a big plate of them on the table, and we could eat them like cookies. The topping didn't harden up as much as it seems to have done in the photos over at Pete Bakes. While still good, the topping was still quite dusty and flour-y. I'm wondering if I mixed too much, and broke the butter up too much, thus no tasty little lumps.

The best thing about mum's crumble recipe is how easy it is. When we suddenly remembered that we had a bag of homegrown raspberries in the freezer, those got defrosted and thrown in. It also saved Patrick from cutting up even more apples.

DSC01024.JPG
hand included for scale

First, the Apple Crumble Bars
(original recipe found at Pete Bakes!)

4 cups flour
1/2 tsp salt
1 1/2 cups sugar
1/2 cup brown sugar
1 1/2 cups butter, softened
6 cups granny smith (or a variety of your choice) apples, skinned and diced (about 5 apples)
1 tsp cinnamon

1. take the butter out of the fridge to soften (do NOT melt) on the counter as you peel and dice up the apples into small cubes. squirt with some lemon juice and set aside.

2. combine the flour, salt, white sugar and brown sugar in a bowl.

3. cut the butter into the dry ingredients. the butter should not be melted. what we’re going for here are crumbs. you can either do this with a wooden spoon, or you can do what i do, and use your hands to crush it all together. (I love using my hands for mixing!)


DSC01021.JPG

4. take 1 cup of the crumb mixture and mix it with the apples. add the cinnamon as well and set aside.

5. preheat the oven to 350 F and grease and flour a 9×13 baking pan. take 1/2 of your remaining crumb mixture and press it into the bottom of the pan. bake for 10 minutes.


DSC01020.JPG

6. remove the crust from the oven, pour in the apple mixture and top with last of the crumbs. put it back in the oven for another 45 minutes. when it’s done, the top should be a beautiful golden brown. cool by putting the pan on a wire rack so air can circulate around it. cut into bars after they’ve completely cooled, if you can resist it. it’s a great idea to refrigerate the bars so they set a bit more.

And now: Heather's Mum's Crumble!

DSC01025.JPG

Really, this is just the recipe for the crumble topping. You can use whatever fruit you want, whatever baking dish you want. I did the deep Corningware because I love lots of fruit. Mum has done it in pie dishes too.

Ingredients:

Fruit
1 cup flour (I always use whole wheat)
1 cup brown sugar
1/2 cup butter
1 cup oats
You can use whatever flour, whatever sugar you think tastes best. Try adding chopped nuts instead of oats!

Fill the dish to just below the edge, with fruit of your choice. Our apples were very tart, so I added some sugar, but not much because the raspberries help sweeten it too.

DSC01015.JPG

Put flour, sugar, and butter into a food processor and pulse until it is all mixed and even. Put this mixture into a bowl, and mix in the oats (you don't want the oats chopped up in the processor).

Pour this mixture over your fruit and pat down. Bake in a 375 degree oven for about 30 to 45 minutes, or until it browns on top, and juices bubble up the edges.

Recipe: Apple-Phyllo Strudel

DSC01118.JPG
I love pastry. As a kid, I'd sneakily break off little balls of any pastry mum was making, hide in the living room, and eat it raw. I always begged for the leftovers from pie crusts so I could play with them. And by play, I meant eat. It was always a very sad moment when it was time to throw away what was left, and clean up my hands. Extra dough always got thrown in the compost, where it got covered in old tea leaves and juice from what might have once been onions.

With this history behind me, I knew I had to do apple-pastry something while in the midst of the Apple Glut of 2008. While searching the freezer for ideas, I found not one, but two boxes of phyllo pastry! All the yum of crispy pastry with almost none of the work! I happily put one box in the fridge to defrost overnight, just like the box said.

DSC01112.JPG

Then the next day, I forgot about it. When I did remember, I just thought 'oh, I'll do that tomorrow!' and went about my business. The next day I had the apples all cooked, the oven pre-heated, amaretti biscuits crumbled, and when I opened the package the phyllo had the exact texture of dried, brittle paper (and about the same taste). Touching it shattered it into a thousand pieces. Was it the extra defrost day? Was it just old? The packaging certainly suggests the latter. I brought out package #2, and defrosted it in 20 minutes by opening the oven door, and placing the plastic-wrapped package on a tea towel on the open door.

(It's worth it to note that I have done this before: the first time I used phyllo, I bought it and brought it home, expecting to be able to use it right away. The oven works. Immersing it in hot water also works, as long as the package is ENTIRELY sealed. Ask me how I know.)

DSC01111.JPG
(why bother dirtying the food processor, when a fork works just as well?)

This dessert was very good. I didn't save the syrup from the frying pan full of apples and sugar, like the recipe suggests, simply because I was already going to be eating the whole thing by myself. It didn't refrigerate too well; the next day it was okay, but after that the phyllo got very soggy. I also didn't add any raspberries or dried fruit.

DSC01114.JPG
Apple-Phyllo Strudel
(original recipe from Epicurious can be found here)

6 Granny Smith apples, peeled, cored and cut into 1/4-inch slices
1/2 cup dried cranberries or cherries
1 1/2 cups brown sugar
1 tsp cinnamon
6 sheets phyllo dough, thawed
Vegetable-oil cooking spray
1/2 cup amaretti cookie or graham cracker crumbs
1/2 cup fresh or frozen raspberries (thawed)
12 oz nonfat vanilla yogurt (optional)

Heat oven to 350°F.

In a 12-inch nonstick pan over medium heat, cook apples with dried fruit, sugar and cinnamon until tender, about 10 minutes. Let cool, reserving liquid for optional sauce. Layer 2 phyllo sheets on top of each other.

Coat top of phyllo layer with cooking spray; sprinkle with 1/3 of cookie crumbs. Layer 2 more sheets of phyllo on top, coat with cooking spray, then crumbs; repeat once more. Spread apple mixture on top; roll up from the shorter end.

DSC01120.JPG
If I'd peeled the apples, there wouldn't be that wonderful pink in the filling!

Coat a cookie sheet with cooking spray. Place strudel on sheet and bake 25 minutes or until golden brown. Let cool. Cut into 8 pieces. Place a slice on each plate; top with berries.

Optional sauce: Mix yogurt with reserved liquid and drizzle over slices.

Friday, September 26, 2008

Recipe: Apple, Onion & Cheese Pizza

DSC01106.JPG
To give myself a chance to eat even more apples, I decided to find a savory apple recipe. This meant I could eat apples for lunch, dinner, and dessert! (I'm much too set in my breakfast ways for apples to intrude.)

I found a wonderful recipe at everybody likes sandwiches. Oddly enough, this recipe is not a sandwich. Once I read the recipe, it made so much sense: apples + cheese = taste sensation. I think it would've been even better with tart apples, but all I had were sweet ones. The caramelized onions were so sweet, I was eating them like candy. I was lucky to end up with enough to cover the pizza.
Still life with most of an Onion

I made my own pizza crust from this recipe, from the same blog. I put it into the warm oven to rise, and I think it may have been too warm. The dough was an odd, spongy texture, and I used all of it to make the one cookie sheet-sized crust you see. It cooked up fine though. I also used whole wheat flour, so that might have done something odd.

Pizza is so easy to adjust, I'm not going to repeat the recipe, but just give a basic rundown of what I put on mine.

I cooked down most of a red onion in a frying pan until it was all soft, then added balsamic vinegar, turned it down a bit, and let it all reduce and get tasty and sweet.
DSC01099.JPG
I found a jar of pesto in the fridge, so I spread some of that on the dough, which I had rolled out on a cookie sheet. Then on went the caramelized onions. I had some goat cheese that needed using up, so that got crumbled over the onions.
DSC01102.JPG
Next came the main ingredient: the apples. Once again, I didn't bother peeling them.
DSC01104.JPG

The apples were topped with lots of Irish cheddar cheese, and then the whole thing got popped into the oven until the cheese was melted and going brown on top (about 25-30 minutes).

DSC01108.JPG

It made a fantastic lunch and dinner for a few days in a row, and it helped me use up things that just happened to be sitting in the fridge.

Wednesday, September 17, 2008

Recipe: Breaded Eggplant 'Fries'

I have come across another produce issue while house-sitting for my parents: fridge veg.
DSC01085.JPG
Mum was very nice and left me with a full fridge, but the fridge is not full of stuff I normally cook. I'm used to cooking broccoli, peppers, mushrooms, but I've never cooked an eggplant. And what is one girl meant to do with an entire cauliflower? There's something I think may be bok choy, there was something squishy and runny in a bag (that got thrown out), and something else mysterious.

I decided to tackle the eggplant first. I love the internet, because I can search so many recipes so easily. Don't get me wrong, I love books (and have a pretty good cookbook selection growing) but the internets are so convenient! And also educational. I found out that the eggplant is a member of the nightshade family (eek!), and is a close relative of tobacco (double eek!) and because of the latter fact, the seeds contain nicotine. I cut them out when I read that, although Wikipedia assures me that the seeds are edible, and the nicotine is negligible. I'd have to eat 20 pounds of eggplant to get the nicotine equivalent of one cigarette.

The world 'eggplant' developed in Canada, the US, Australia, and New Zealand. Most of the rest of the world uses 'aubergine', unless you're in India, where they call it 'brinjal'.

I also learned that to tell if an eggplant is ripe, press the pad of your thumb against the eggplant. If it bounces back, it's ripe. Too ripe if the indent stays.

Thusly armed with knowledge, I decided to go with this recipe from Joyful Abode.
DSC01084.JPG

A note on breadcrumbs:
This being my mum's kitchen, I wasn't sure what I'd find in the cupboards, and I really didn't feel like going out to buy more groceries, to make a recipe I chose in the first place to use stuff up. I found a jar (unlabeled, of course) of what I guessed was wheat germ. I couldn't find any bread crumbs (apart from the crumbs collecting at the bottom of a bag of crutons) so I did a deep cupboard search. I found a collection of bags that I believe to be from when my grandpa lived here, and were used for his grainy, mushy cereal. They were all crumbly, and full of fibre, and I am all about the whole grains, so instead of bread crumbs, I used a mix of cracked wheat, bran, crumbs from the cruton bag, and a touch of psyllium fibre (I'm not even sure what that is, but I was in an adventurous mood!).

Breaded Eggplant 'Fries'
DSC01093.JPG
  • 1 large eggplant
  • 1/2 cup toasted wheat germ (I didn't bother toasting, because I wasn't sure what I had was actually wheat germ)
  • 1/2 cup Italian breadcrumbs (or random mix of other flaky kitchen things)
  • 1/2 cup parmesan cheese
  • 1/2 teaspoon garlic salt
  • 3 eggs, beaten (I think I could've gotten away with two)
Preheat the broiler (mum's automatically came on at 550 degrees).

Cut eggplant into little french-fry like wedges, and then if you want to, you can salt them with Kosher salt to draw out the bitter juices. The way I did it this time was to put the wedges into a colander over a bowl, sprinkle liberally with kosher salt, and top with a smaller colander weighted with the Kosher salt box, so the eggplant pieces were squished. (I did this. Don't know if made a difference, but the fries weren't bitter)

Mix together your crumbs, cheese, and salt in a bowl.
DSC01089.JPG

When your eggplant sticks are ready, rinse or wipe off the salt and pat dry with towels. Then dip each stick into the beaten eggs, and roll in the breadcrumb/wheat germ mixture. Place on a cookie sheet prepared with cooking spray.
DSC01091.JPG
Broil for 2-3 minutes, flip the sticks, then broil for 2-3 more minutes, or until crispy. I tried 3 minutes the first time, and that was enough to set of the smoke alarm.

The first night, I ate these with mum's mustard collection (Provencal red pepper mustard, tarragon mustard, and good ol' Dijon), and a blob of pesto for a rest from the heat.
The next day, I heated the leftovers up in the oven (microwave would've turned them to mush), and dipped them in Thai-style peanut sauce.
DSC01094.JPG

Sunday, September 14, 2008

Recipe: Eve's Pudding

DSC01067.JPG
It's that time of year again. The time when apples are popping up wherever you look. I have been innundated in apples for the past few weeks. Luckily, I have had some variety though; Lester brought me 3kg of teeny, tart little green apples. Just as I was almost done with those, I came out to my parents' house in BC to house sit. They have not one, but TWO apple trees. Luckily for my sanity, one has a grand total of 7 apples on it. The other one is a different story.
DSC01044.JPG
Spindly, yes. But fruitful. Dad planted these just after we moved to this house 10 years ago. He also planted some plum trees that have produced nary a plum.
But back to the first of many apple recipes I have saved up for you readers.

I have been trawling the internet for any and all apple recipes I can find. You see so many recipes that look promising, but then I read the ingredients, and there's that disheartening line that says 'peel and core one apple'. I don't have one apple. I have bushels. I don't want to make 12 muffins and only use one apple.
Step One

I have a bit of a confession: I don't like eating raw apples. And I despise apple juice. If I do eat raw apples, I like them cut up. I got out of the habit of raw apples when I had braces, and never got back in.

This recipe used 3 apples, which was slightly better. Right now I'm hampered by the fact that I'm alone in this city; any friends I once had here have moved away. So I want to use lots of apples, but not eat myself into being an apple blimp.
DSC01062.JPG

Eve's Pudding is a British recipe, so forget your colonial thoughts of pudding being a mysterious, wobbly, semi-solid. Pudding just means dessert, so forget the Jello (can I put apples in Jello?). It is basically just apples, topped with a traditional Victoria sponge cake. The sponge creates a lid for the baking vessel, which means the apples get steamed so they are nice and tender.

Whenever recipes say to peel the apples, I ignore that. I think a lot of the flavour is in the peel, not to mention fibre and nutrients. I grew up with apple trees in the garden my whole life, and have never felt the need to peel them before eating. Scared of bug footprints? Rise 'em, but you don't need to wrestle off that scary outer layer that has (gasp) touched the outside world.

This recipe was nice, easy, and has a good ratio of apples to other stuff. Right now I want more apples than other stuff, for the aforementioned reason of not wanting to become as round as an apple. The original recipe (found here, at Curiously Ravenous) mentioned milk in the directions, but not in the ingredients. I looked around at other Victoria Sponge recipes, and none of them called for milk, so I left it out.
DSC01065.JPG

Eve's Pudding
for the Victoria Sponge Cake:

1 1/4 cup flour
1 1/4 tsp baking powder
pinch salt
1/2 cup unsalted butter, at room temperature
6 Tbsp sugar
2 eggs
1/2 tsp vanilla extract

3 apples, peeled and cored
1/4 cup sugar
1 Tbsp lemon juice
1/2 tsp cinnamon
pinch salt

1. Slice apples into thin 1/8" slices. Gently toss with 1/4 cup sugar, lemon juice, and cinnamon. Set aside.

2. Preheat oven to 350F. Whisk together flour, baking powder and salt. In another bowl, cream together butter and sugar with a mixer until it becomes smooth and pale. Alternately add in the eggs and flour mixture. Do not over beat.
DSC01064.JPG
3. Spoon apples into 6 to 8 single-serving ramekins or one 48oz souffle pan, about 3/4 of the way full. Pour any remaining juices over the apples. (I just mixed my apples etc. in the 1.5L Corningware dish I wanted to cook the pudding in. Saves cleaning one bowl!)

4. Spoon batter over the apples and level out the batter to form a flat seal to cover the fruit (a flat spatula might make this easier, but I used a wooden spoon). Sprinkle the top with sugar.

5. Bake for 45 minutes.


After 45 minutes, my sponge was not entirely cooked in the middle, so make sure to check before you turn the oven off.